[[Docker]] Setup
Portainer setup
In order to remotely manage your containers, have portainer run on your local machine like this:
docker run -d -p 8001:8000 -p 9443:9443 --name portainer \
    --restart=always \
    -v /var/run/docker.sock:/var/run/docker.sock \
    -v portainer_data:/data \
    portainer/portainer-ce:latest
You can now log in with https://HOST_IP:9443
Mosquitto setup
Since running mosquitto with the current configuration fails due to missing permissions for the default user to create log files etc., the following steps are necessary.
Prepare an empty configuration file mosquitto.conf and copy it over to the correct location for docker-compose to use it.
Start the mosquitto container with the empty configuration file: docker-compose up -d mosquitto
Verify that the mosquitto container is running: docker-compose ps
$ docker-compose ps
  Name                 Command               State           Ports
---------------------------------------------------------------------------
mosquitto   /docker-entrypoint.sh /usr ...   Up      0.0.0.0:1883->1883/tcp
portainer   /portainer -H unix:///var/ ...   Up      0.0.0.0:9000->9000/tcp
Attach to the docker container: docker exec -it mosquitto ash
Create the users, set the correct owner for the user file and clear the command history. Source: http://www.steves-internet-guide.com/mqtt-username-password-example/
$ cd /mosquitto/data
$ vi users.db

ha:[password from 1P for "Mosquitto User Home Assistant"]
zigbee:[password from 1P for "Mosquitto User zigbee2mqtt"]

$ mosquitto_passwd -U users.db
$ chown mosquitto:mosquitto users.db
$ exit
Stop the container: docker-compose stop mosquitto.
Delete the container: docker-compose rm mosquitto.
Replace the blank mosquitto.conf file with the actual mosquitto.conf file and make sure it is writable by docker: sudo chgrp -R docker mosquitto/
Bring up the fully configured container: docker-compose up -d mosquitto.
Verify that the container started correctly: docker-compose ps. Optionally, verify the log entries for the mosquitto container by running docker-compose logs mosquitto or Portainer.
Add new users
To add additional users to the existing users.db file, run the following commands:
# connect
docker exec -it mosquitto ash

# add users
cd /mosquitto/data
mosquitto_passwd -b users.db newuser password

# delete history
cat /dev/null > ~/.ash_history && history -c && exit
Now restart the mosquitto container for the added user to be recognized.
This adds the user newuser to the password file (with encrypted password) and afterwards clears the shell history so that the password cannot be found anymore in clear text. Note, that this also logs you out to make sure no history kept in memory is being flushed to the history file again.
Influxdb Setup for Home Assistant
In order for home assistant to work with InfluxDB, a database called home_assistant has to exist.
Source: https://www.home-assistant.io/components/influxdb/#configuration
Here is how we create it:
Start the InfluxDB container: docker-compose up -d influxdb
Connect to the container: docker exec -it influxdb bash
Create the database:
$ influx

> CREATE DATABASE home_assistant
> SHOW DATABASES
> exit

exit
Restart the home assistant container if needed and check the log files.
Reverse Proxy
To set up external access, we use [[Cloudflare]] Zero Trust Tunnels to expose the applications without needing our reverse proxy running on a public VM. Follow How to Use Cloudflare Tunnel to Expose Multiple Local Services to set this up.
Then we secure access to these services using Cloudflare Zero Trust applications.
Caveat: in order for the Nextcloud web interface to work, you need to create a page rule which skips performance optimizations:
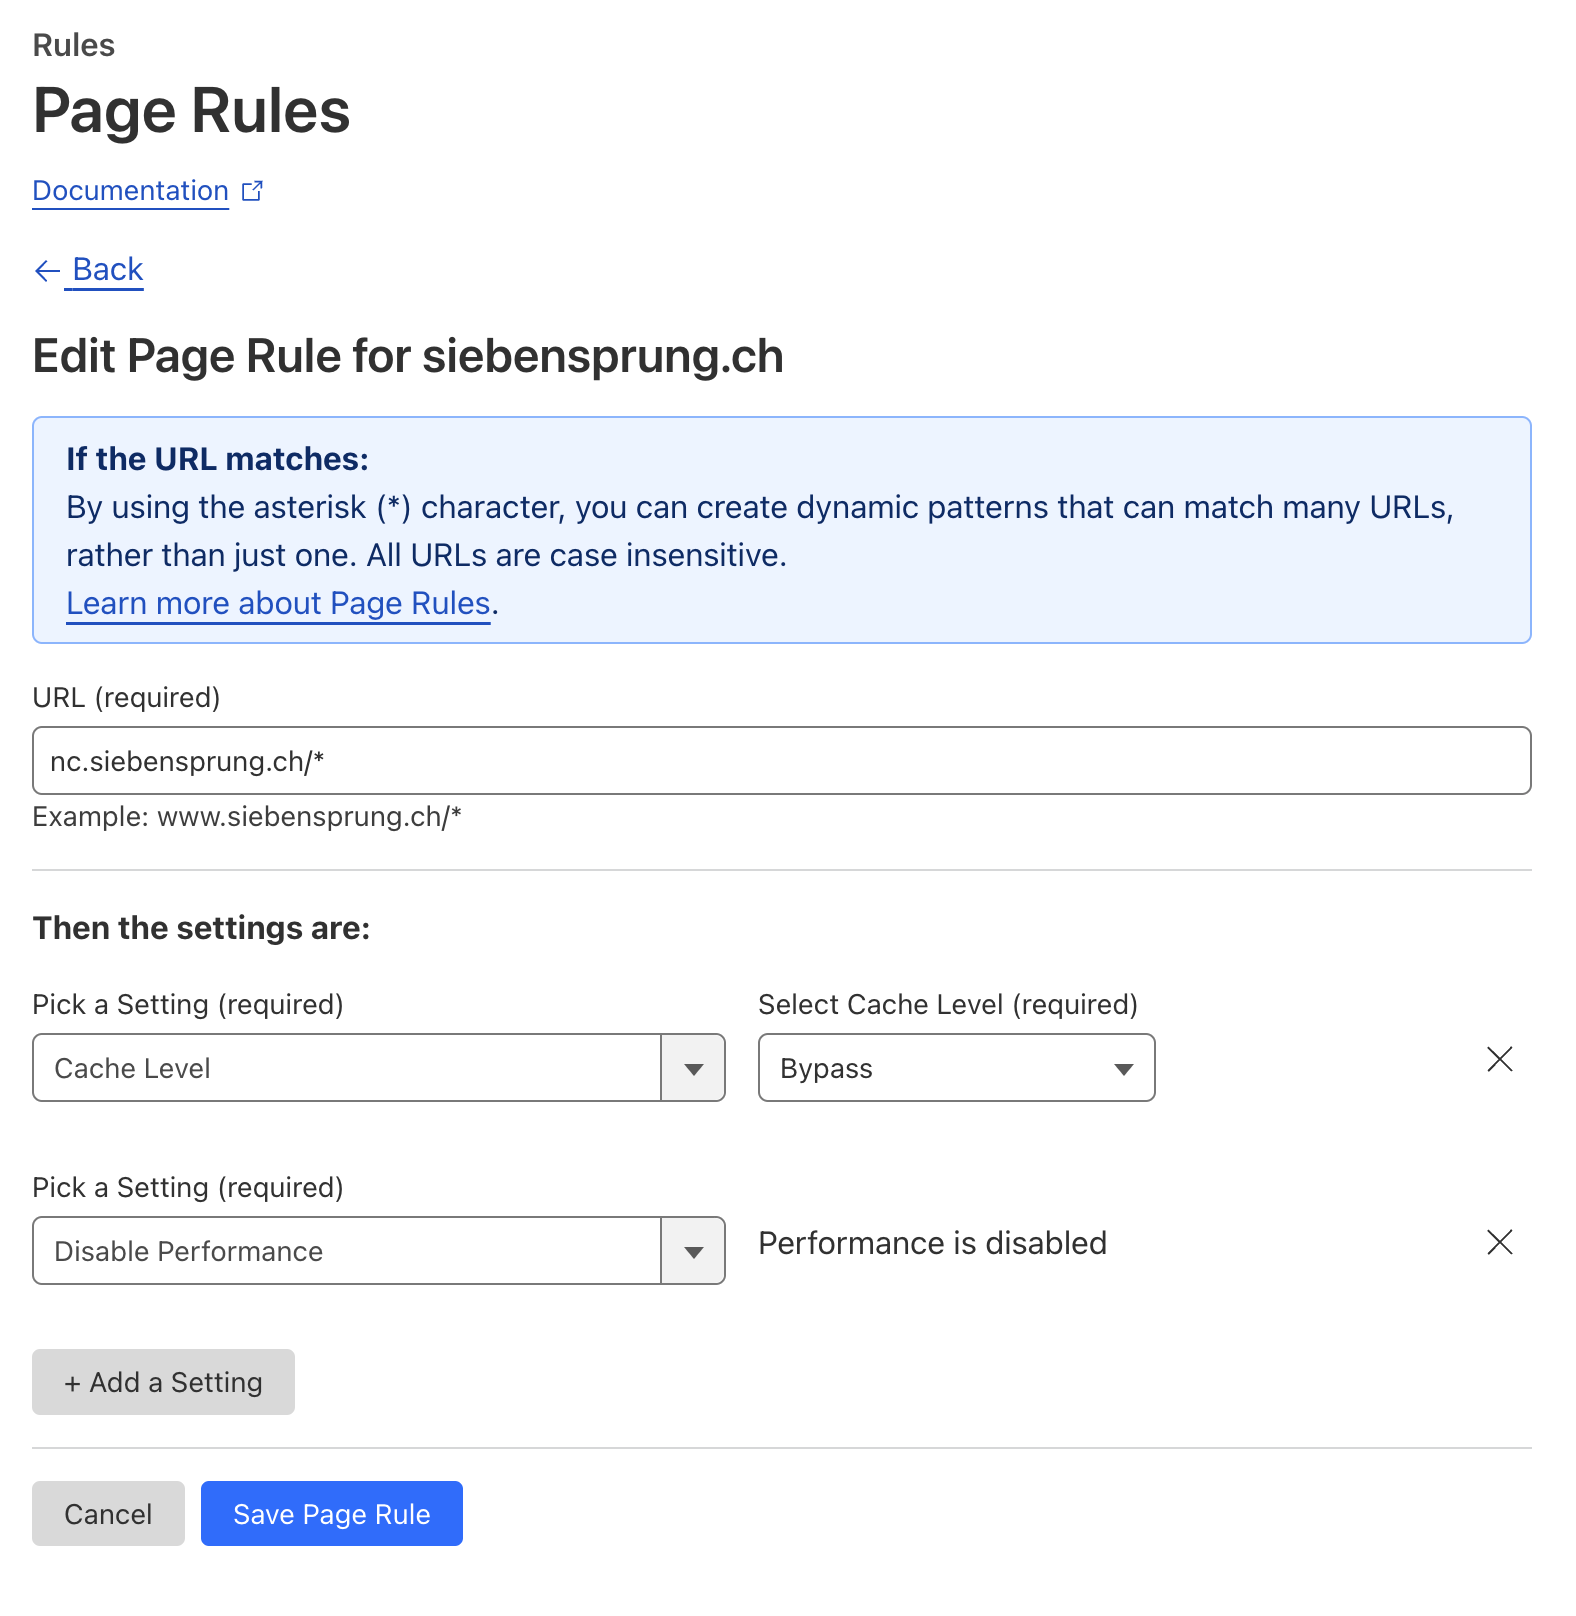
Background info: https://github.com/nextcloud/all-in-one#notes-on-cloudflare-proxytunnel and https://autoize.com/nextcloud-with-cloudflare-security/
Renovate
Dependency management. Dashboard