Proxmox Backup Server Installation
Manual Installation
Prepare an USB stick with Proxmox Backup Server 4.x (PBS). Boot from the stick and follow the installer.
For networking, use IP addresses 192.168.1.66/24 with gateway 192.168.1.1 and DNS server 192.168.1.1.
For the hostname, choose pbackup.sieben. Since sieben is configured on the Unifi USG as the internal domain, we use it for our purposes.
Note: it is recommended to use home.arpa for the domain name. See https://datatracker.ietf.org/doc/html/rfc8375. However, we still go with .sieben since that has been working fine.
Make sure the router's [[DHCP]] assigns the reserved IP addresses. If this is not the case, abort the installation, reboot (not shutdown) and try again. It looks like the router does not pick up the PC right away, therefore the Proxmox installer defaults to a statically assigned IP. I entered the correct Gateway and DNS IP 192.168.1.1 manually, then advanced one step, then aborted and rebooted. The next time, the DHCP server kicked in and suggested the correct network settings.
[!warning] After booting, I am not sure that the server really picked up DHCP. When I check
/etc/network/interfaces, it still looks statically assigned. However, some attempts to change this where not successful, so I am leaving it as is but will keep this in mind, should I have to change the IP in the future. The IP of the DNS server is set to192.168.1.1. This is in contrast to the setup for the Proxmox nodes which are using100.100.100.100.
cat /etc/network/interfaces:
auto lo
iface lo inet loopback

auto eno1
iface eno1 inet static
        address 192.168.1.66/24
        gateway 192.168.1.1

iface wlp0s20f3 inet manual


source /etc/network/interfaces.d/*
Check whether you can connect to the admin UI through https://192.168.1.66:8007 and log in with root and the password you have set.
Now run the post installation script to configure a few basics like disabling the enterprise subscription repo, disabling the nag screen, updating all packages etc.
bash -c "$(curl -fsSL https://raw.githubusercontent.com/community-scripts/ProxmoxVE/main/tools/pve/post-pbs-install.sh)"
Update the password on the server. See 1Password for Proxmox Backup Server:
passwd
On your local host, create an entry for easy ssh access in ~/.ssh/config:
Host pbackup
  HostName 192.168.1.66
  User root
  IdentityFile ~/.ssh/patschifigpro_rsa
Install an ssh key for secure access:
ssh-copy-id -o IdentitiesOnly=yes -i ~/.ssh/patschifigpro_rsa pbackup
Make sure that the hostname is shown in the Unifi Controller under Clients -> prox-h[1..n] -> Details -> Hostname. If Hostname is missing, then the registration has not happened yet.
You can verify all registered clients by checking /etc/hosts on the Unifi USG (not on the Controller). Enable SSH access first to the USG.
Now you should be able to reach the node at https://pbackup.sieben. If not, this could indicate that DHCP has not been configured.
## Prevent system log from growing too much

```sh
ssh pbackup "echo 'SystemMaxUse=500M' >> /etc/systemd/journald.conf && systemctl restart systemd-journald"
Tailscale on PBS
Install Tailscale with
curl -fsSL https://tailscale.com/install.sh | sh
tailscale up
For Proxmox, there are some specific settings documented here. Currently, none of these are implemented in our system since accessing through e.g. https://pbackup:8007 works well enough.
Note: root access is currently disabled in the Tailscale ACL, so ssh access through tailscale does not work which is why we do not configure it at all. However, you can still access the web UI (or modify the ACL to allow root) and also open a terminal session from there.
Disable expiry, add the tags proxmox and server.
Add a service called pbs on proxmox, listening to tcp/443:
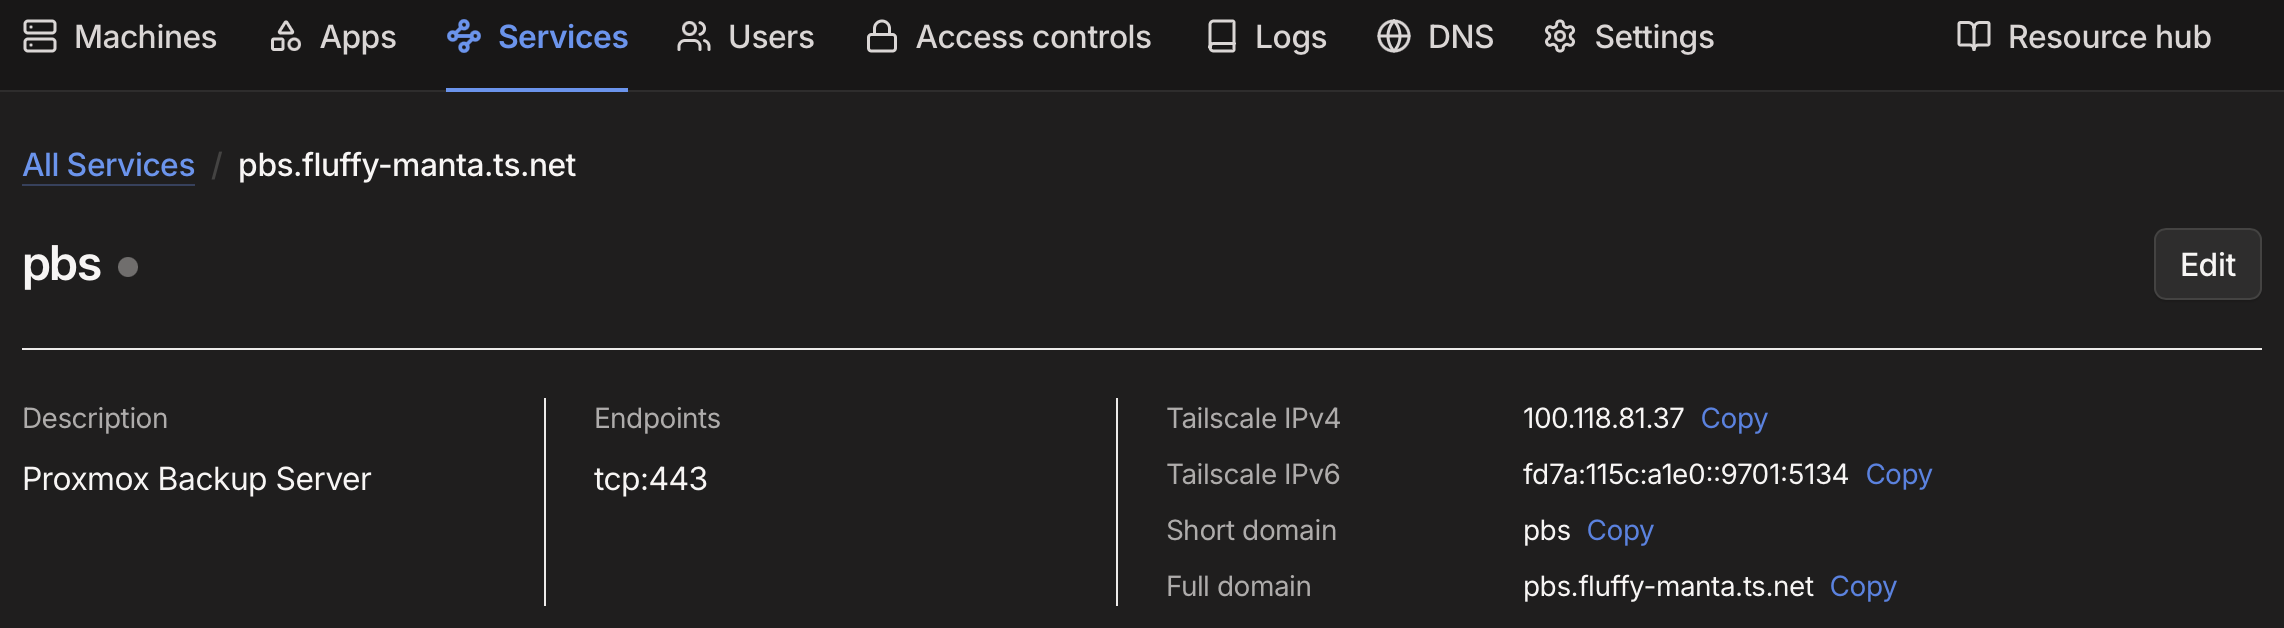
On the backup server host, add a service:
tailscale serve -service=svc:pbs --https=443 https+insecure://localhost:8007
In the Tailscale Service UI, approve the host.
[!tip] Make sure to add a tag to your PBS hosts if not done already since tags are required to make services work.
Add the new url https://pbs....ts.net to the Proxmox 1Password entry.
https://pbs.fluffy-manta.ts.net/
Test the connection (you might have to do this in a private browsing session).
Pi-hole integration
Note: currently not in use
When all nodes show up with a hostname on the USG, go the pi-hole -> Settings -> DNS and click on save to trigger reloading of the service or simply wait a bit.
Backup Configuration
Create a user under Configuration -> Access Control -~ Usesr Management:
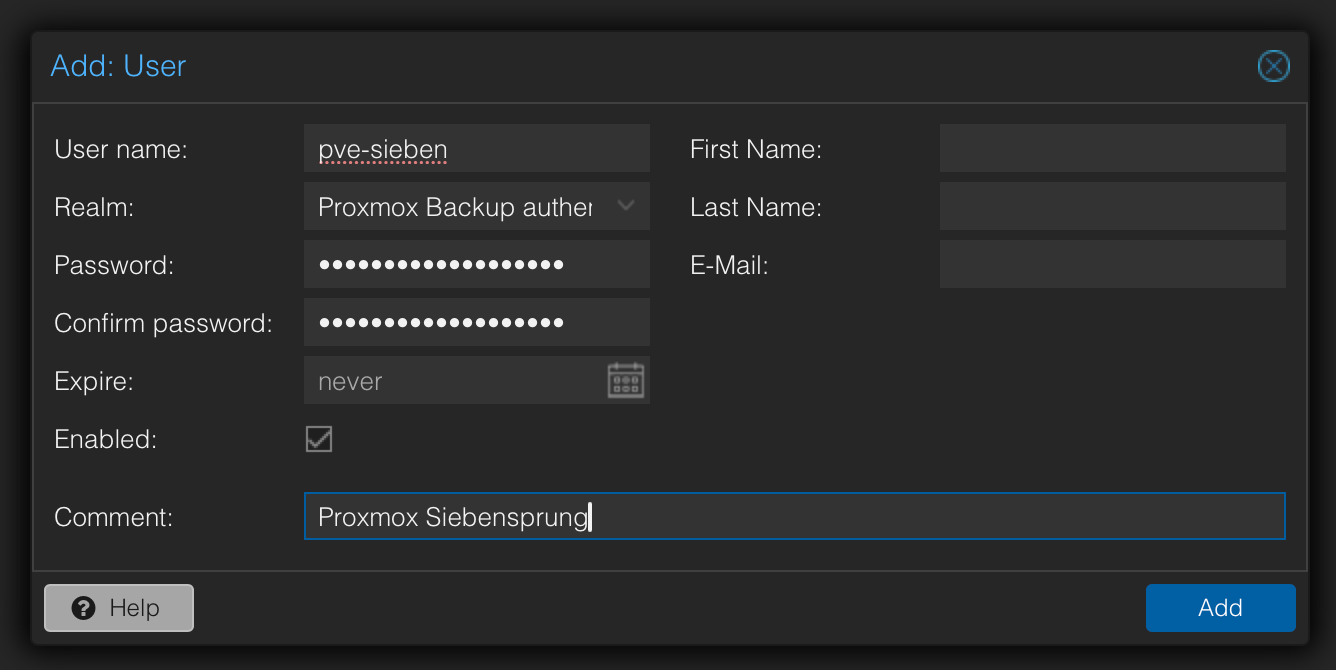
See Proxmox Backup Server User for the Password in [[1Password]]. Note that the username stored in there has the realm @pbs added.
Prepare USB Disk
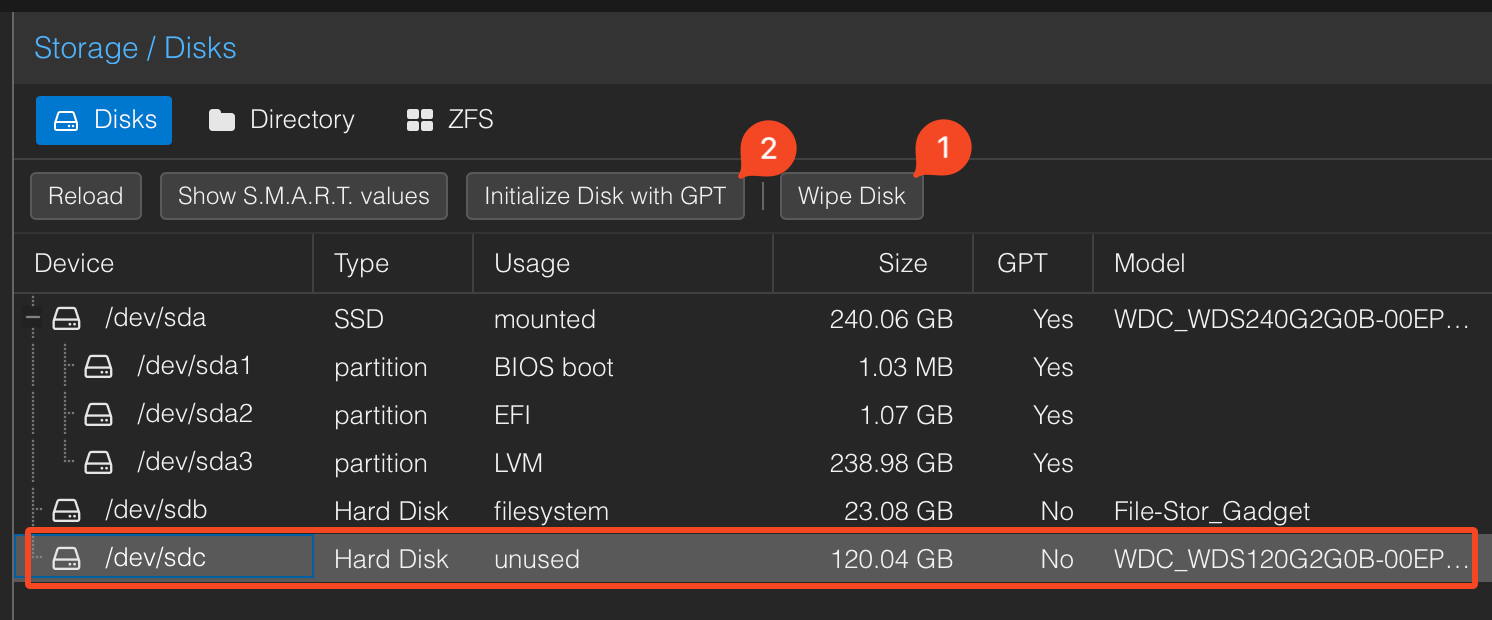
Attach a USB drive (M2 SSD in external enclosure in our case). The disk is recognized as /dev/sdc.
Wipe the disk according to our instructions.
Additionally, in PBS we wipe the disk and initialize it again just to make sure it is according to the PBS requirements:
Now we can create a backup directory. Since it is an external USB disk, make sure to check the Removable datastore option:
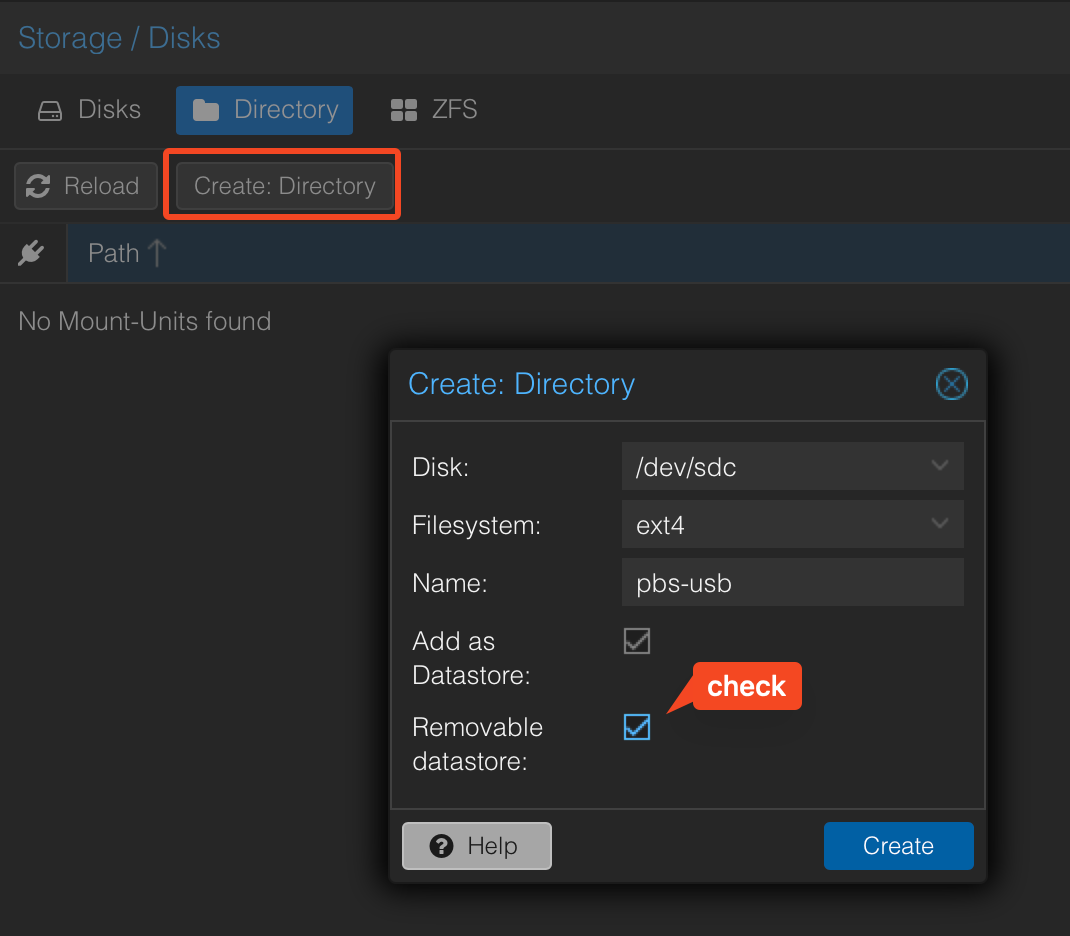
This also creates a datastore which we will configure next.
USB Backup
We store local backups on the external USB disk under /mnt/datastore/usb-backup.
Create a new namespace Siebensprung under Datastore -> usb-backup -> Content -> Add Namespace.
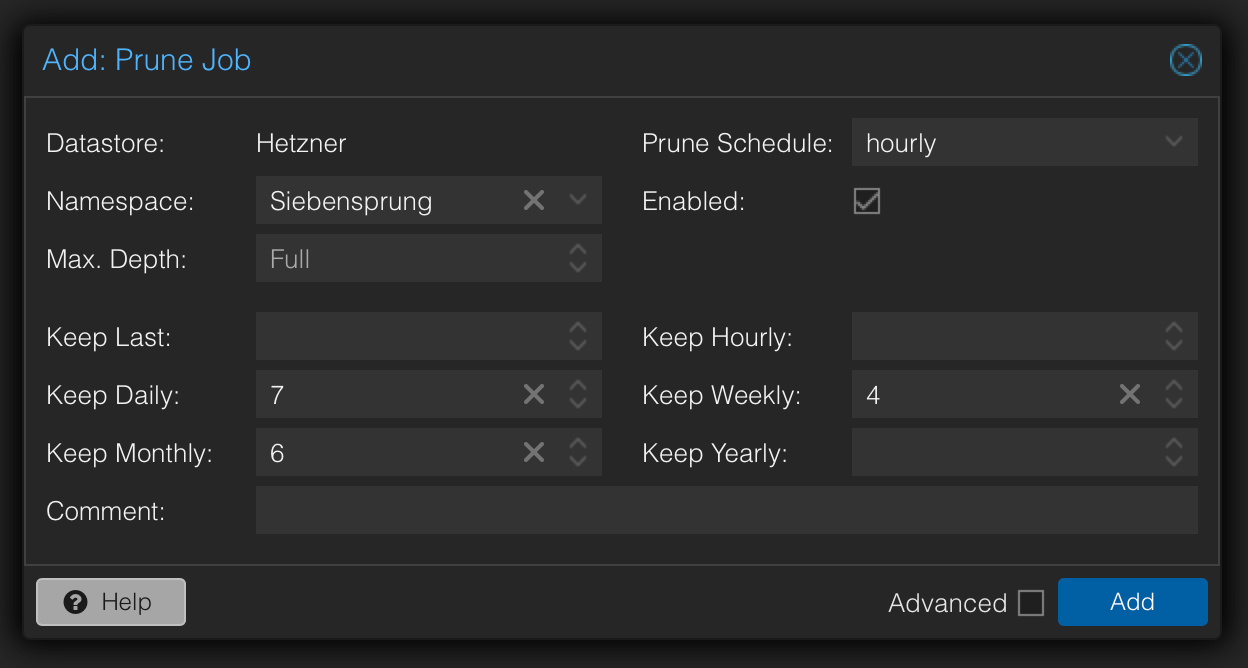
Set up a prune job under Datastore -> usb-backup -> Prune & GC Jobs:

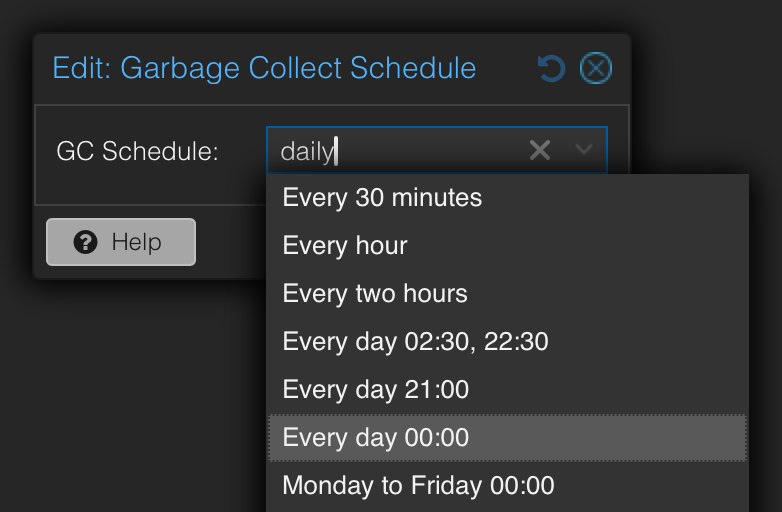
Create or modify the Garbage Collect Job to run daily at midnight:
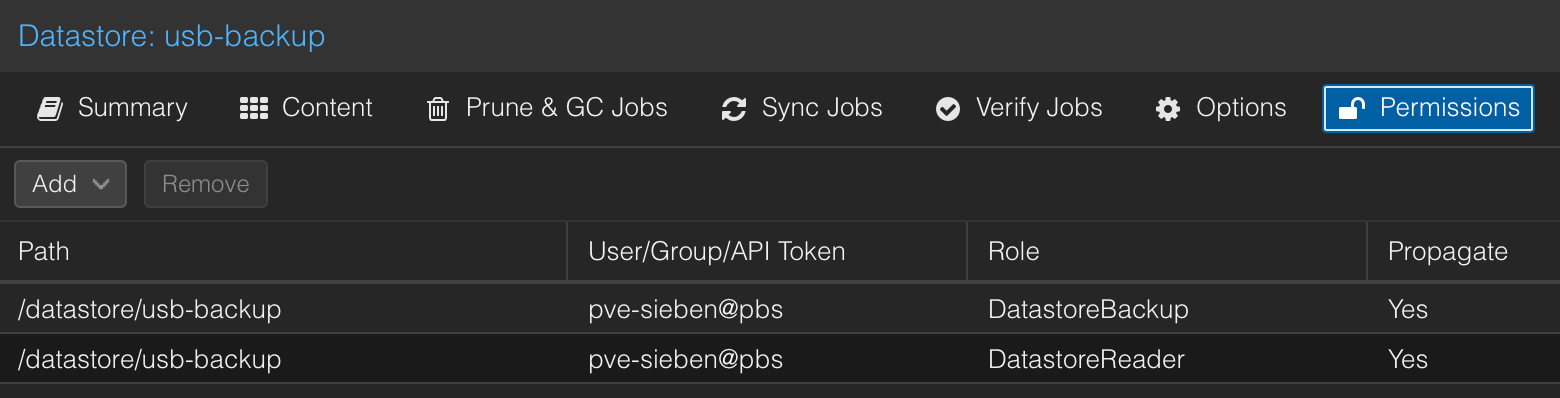
Next set up two permissions under Datastore -> usb-backup -> Permissions -> Add -> User Permission: DatastoreReader and DatastoreBackup for user pve-sieben@pbs
S3 Backup at Hetzner
Create a Object Storage pbs-backup-siebensprung with Object Lock over at Hetzner and activate the deletion protection (lock icon). Create a user PBS for accessing the vault.
Back in PBS, create an S3 Endpoint under Configuration -> S3 Endpoints -> Add:
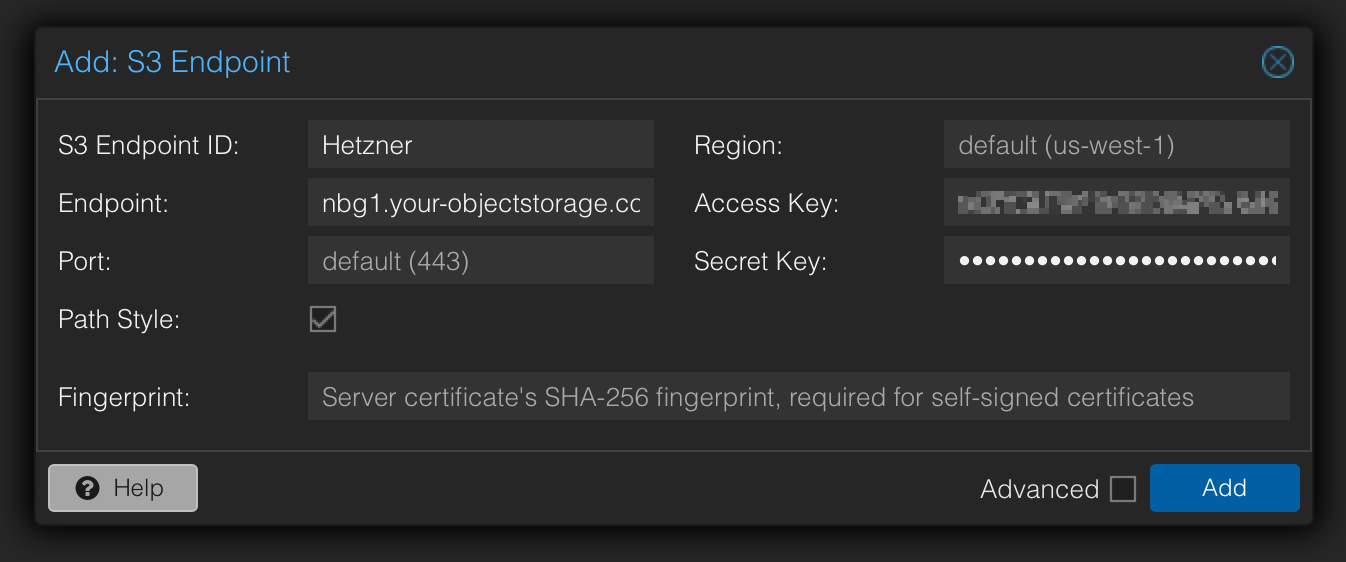
Make sure to check Path Style.
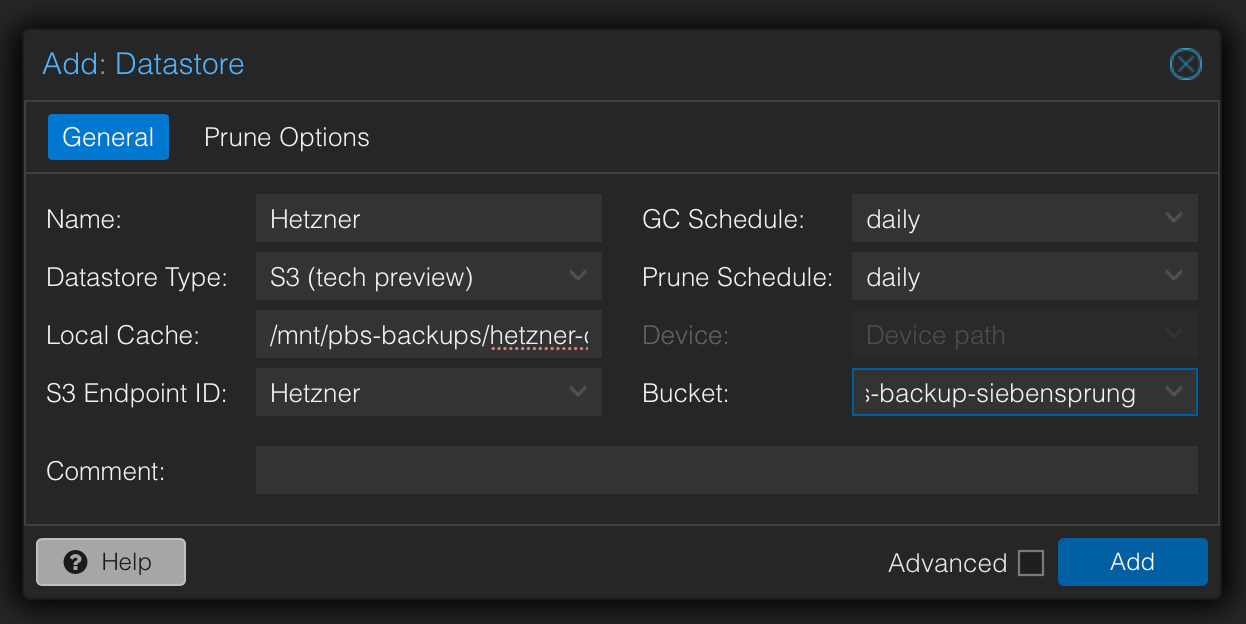
Next add a S3 Datastore (leave the prune options at default since we will set them later):
- Local Cache:
/mnt/pbs-backups/hetzner-cache - Bucket:
pbs-backup-siebensprung
Create a new namespace Siebensprung under Datastore -> Hetzner -> Content -> Add Namespace.
Set up a prune job under Datastore -> Hetzner -> Prune & GC Jobs:
Remove the default prune job called default-Hetzner-....
Create or modify the Garbage Collect Job to run daily at midnight:
Next set up two permissions under Datastore -> Hetzner -> Permissions -> Add -> User Permission: DatastoreReader and DatastoreBackup for user pve-sieben@pbs

Configure the Backups for Proxmox
On one of the Proxmox nodes, go to Datacenter -> Storage and add Proxmox Backup Server:
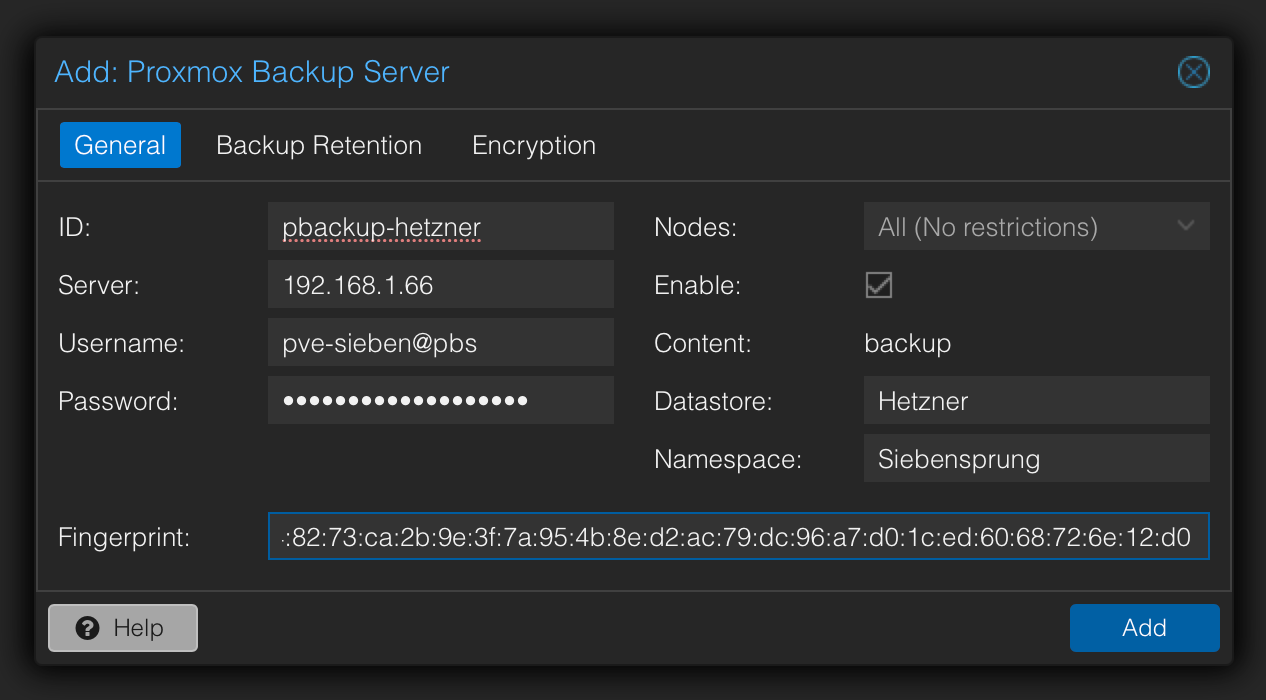
Copy the fingerprint from PBS under Dashboard -> Show Fingerprint.
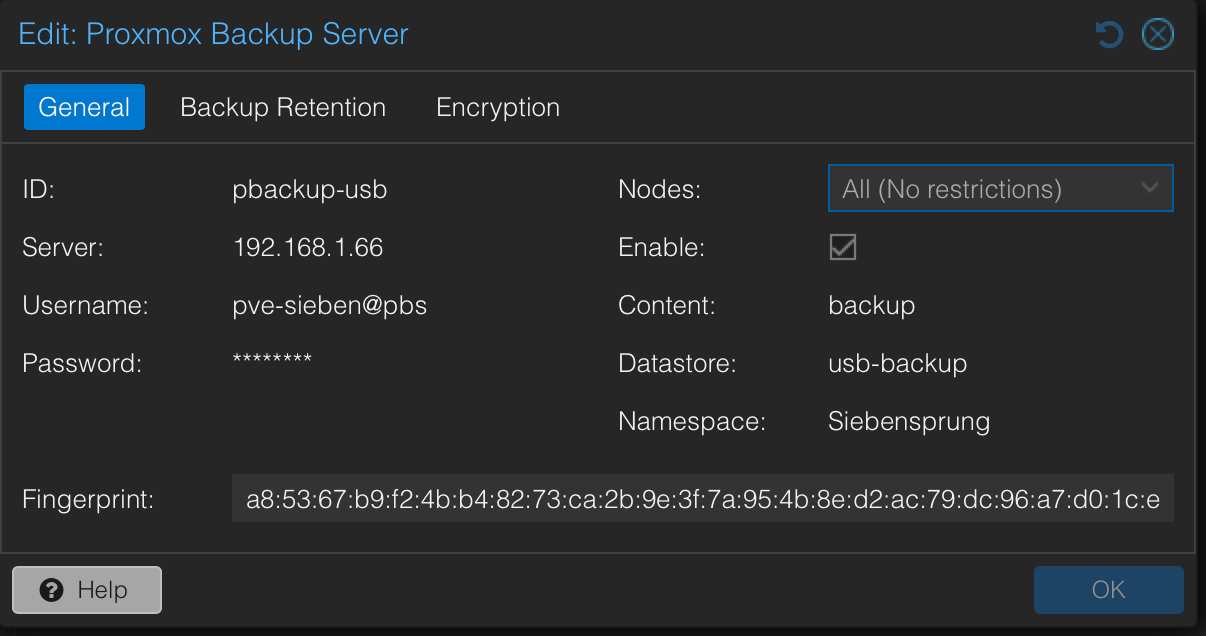
Add another Backup Server for the USB backups:
Now we add the backup schedules under the Datacenter -> Backup node:
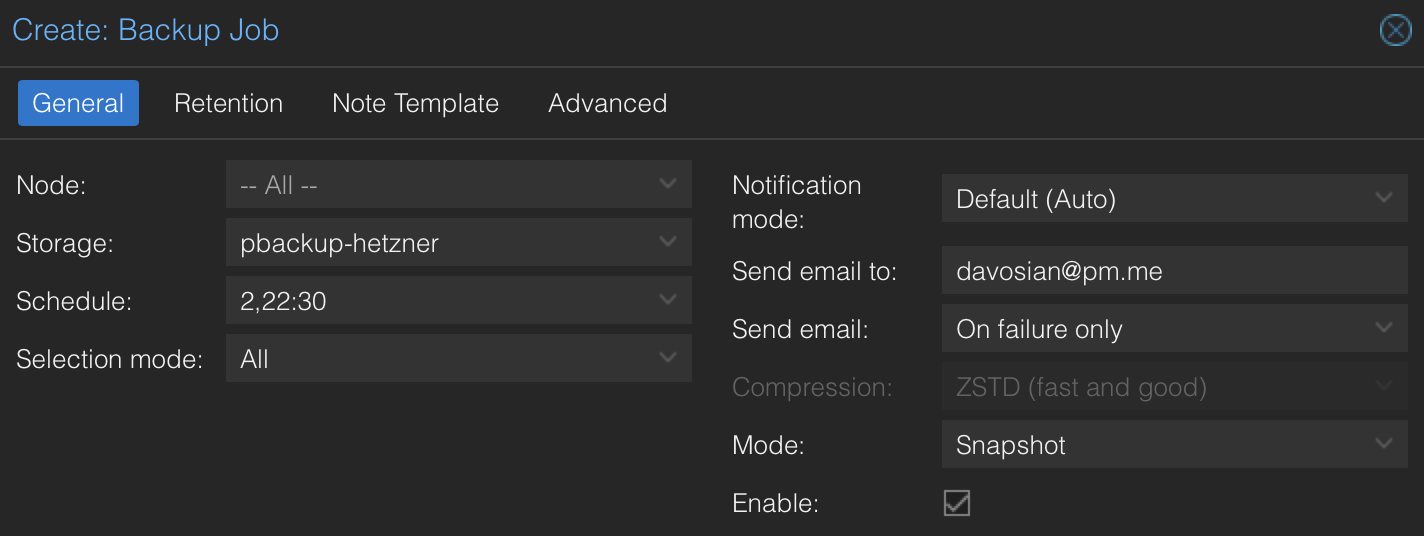
Schedule is Every day 02:30, 22:30.
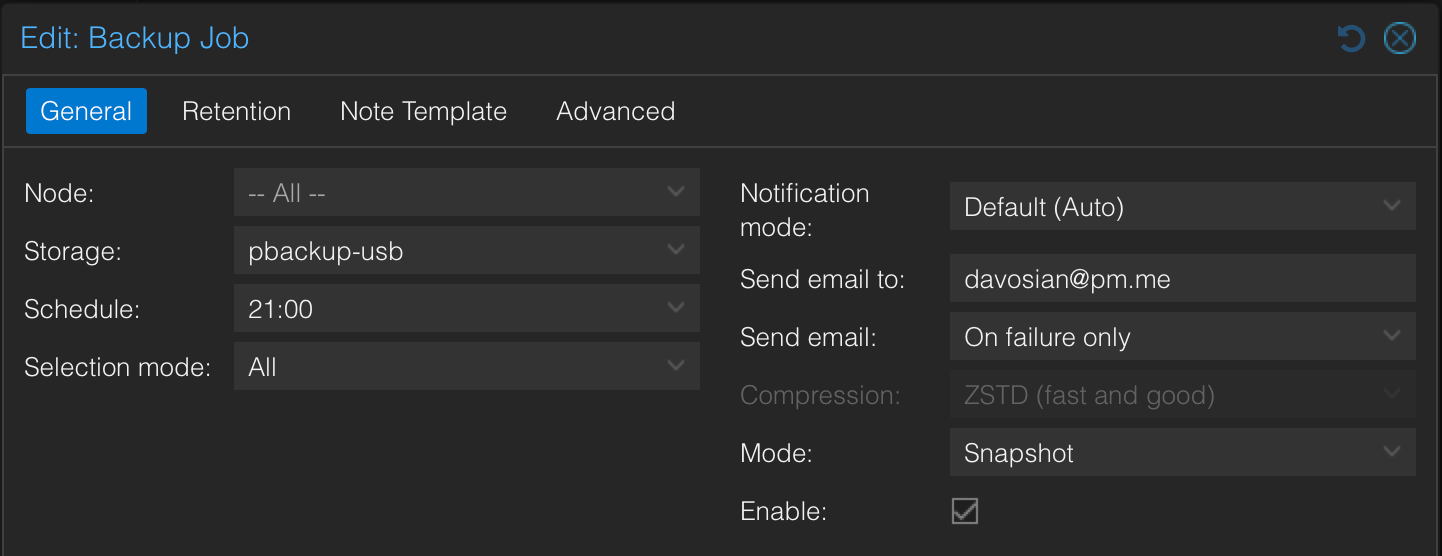
Schedule is `Every day 21:00.
[!info] Since the disk space on the backup server is rather slim (currently a 256 GB SSD) and is also used as cache for the Hetzner job, keeping an eye on the disk space is important.
Auto-Reboot
In order to ensure a stable system, we reboot it on a daily schedule. We use a “Safety Check” script to prevent the server from rebooting while a backup, prune, or garbage collection task is actively running.
Create the script at /usr/local/bin/safe-reboot.sh :
#!/bin/bash

# Get a count of running tasks, EXCLUDING the web console (termproxy)
# We filter for "running", but invert-match (-v) "termproxy"
ACTIVE_TASKS=$(/usr/sbin/proxmox-backup-manager task list \
    | grep "running" \
    | grep -v "termproxy" \
    | wc -l)

if [ "$ACTIVE_TASKS" -eq 0 ]; then
    echo "$(date): No active backup/maintenance tasks. Rebooting..." >> /var/log/daily-reboot.log
    /usr/sbin/reboot
else
    # Log which tasks blocked the reboot for debugging
    echo "----------------------------------------------------------------" >> /var/log/daily-reboot.log
    echo "$(date): SKIPPED reboot. $ACTIVE_TASKS critical tasks are running:" >> /var/log/daily-reboot.log
    proxmox-backup-manager task list | grep "running" | grep -v "termproxy" >> /var/log/daily-reboot.log
fi
Make it executable:
chmod +x /usr/local/bin/safe-reboot.sh
Schedule it via Cron: crontab -e
30 10 * * * /usr/local/bin/safe-reboot.sh