Proxmox Installation
There is an easy way to install Proxmox 8 using a set of scripts from the Proxmox community repository. We basically follow along this guide from Derek Seaman's Tech Blog with integration into our Unifi network and local storage.
We make sure to first install Proxmox on all nodes forming the Proxmox cluster. We then also configure Ceph on the cluster.
Upgrading to version 8
Be careful when upgrading using the script from the repository above: since we are running a Ceph cluster, this one has to be upgraded first, according to the official Proxmox documentation. When I ran through the steps, I missed this and ended up with one node only booting into INITRAMFS.
I was able to fix this by running a disk check on the node:
fsck -f -c -y /dev/mapper/pve-root
Reference was this discussion on the Proxmox forum: https://forum.proxmox.com/threads/why-do-i-get-pve-root-needs-manual-fsck-at-initramfs.104829/
Manual Installation
Make sure you have clean hard disks: Format a disk on Linux
Prepare an USB stick with Proxmox 9.x Boot from the stick and follow the installer.
For networking, use IP addresses 192.168.1.61/24 to 192.168.1.69/24 with gateway 192.168.1.1 and DNS server 192.168.1.1.
For the hostname, choose prox-h[1..n].sieben for the [[Intel NUC]]s and prox-u[1..n] for the Alliwava U58. Since sieben is configured on the Unifi USG as the internal domain, we use it for our purposes.
Note: it is recommended to use home.arpa for the domain name. See https://datatracker.ietf.org/doc/html/rfc8375. However, we still go with .sieben since that has been working fine.
Make sure the router's [[DHCP]] assigns the reserved IP addresses. If this is not the case, abort the installation, reboot (not shutdown) and try again. It looks like the router does not pick up the PC right away, therefore the Proxmox installer defaults to a statically assigned IP. I entered the correct Gateway and DNS IP 192.168.1.1 manually, then advanced one step, then aborted and rebooted. The next time, the DHCP server kicked in and suggested the correct network settings.
[!warning] After booting, I am not sure that the server really picked up DHCP. When I check
/etc/network/interfaces, it still looks statically assigned. However, some attempts to change this were not successful, so I am leaving it as is but will keep this in mind, should I have to change the IP in the future. The IP of the DNS server is set to100.100.100.100. This is in contrast to the setup for the Proxmox Backup Server which is using192.168.1.1.
cat /etc/network/interfaces:
auto lo
iface lo inet loopback

iface eno1 inet manual

auto vmbr0
iface vmbr0 inet static
        address 192.168.1.64/24
        gateway 192.168.1.1
        bridge-ports eno1
        bridge-stp off
        bridge-fd 0

iface wlp2s0 inet manual


source /etc/network/interfaces.d/*
Check whether you can connect to the admin UI through https://192.168.1.6[1..n]:8006 and log in with root and the password you have set.
Now run the post installation script to configure a few basics like disabling the enterprise subscription repo, disabling the nag screen, updating all packages etc. This needs to be done on each server:
bash -c "$(curl -fsSL https://raw.githubusercontent.com/community-scripts/ProxmoxVE/main/tools/pve/post-pve-install.sh)"
Careful: do not disable HA mode when asked.
Next install the PVE Processor Microcode script on each node:
bash -c "$(curl -fsSL https://raw.githubusercontent.com/community-scripts/ProxmoxVE/main/tools/pve/microcode.sh)"
When given a choice which package to install, pick the one without debian in its name. After rebooting, verify that the microcode patch has been applied:
journalctl -k | grep -E "microcode" | head -n 1
Now update the password on each server. See 1Password for Proxmox Cluster:
passwd
On your local host, create an entry for each node for easy ssh access in ~/.ssh/config:
Host prox-h1
  HostName prox-h1.sieben
  User root
  IdentityFile ~/.ssh/patschifigpro_rsa

Host prox-h2
  HostName prox-h2.sieben
  User root
  IdentityFile ~/.ssh/patschifigpro_rsa

Host prox-u1
  HostName prox-u1.sieben
  User root
  IdentityFile ~/.ssh/patschifigpro_rsa
Install an ssh key for secure access:
ssh-copy-id -o IdentitiesOnly=yes -i ~/.ssh/patschifigpro_rsa root@192.168.1.6[1..n]
On each proxmox node, run dhclient eno1 to register the server properly within the Unifi Cloud Gateway. Make sure that the hostname is shown in the Unifi Controller under Clients -> prox-h[1..n] -> Details -> Hostname. If Hostname is missing, then the registration has not happened yet.
You can verify all registered clients by checking /etc/hosts on the Unifi UCG (not on the Controller). Enable SSH access first to the USG.
Create cluster and join all nodes. Note that the log output might not show and a "connection lost" message might come up when joining a cluster. Reload the web UI and check the output again to make sure that joining was successful.
Now you should be able to reach each node at https://prox-h[1..n].sieben. If not, this could indicate that DHCP has not been configured.
Also check the cluster status with pvecm status
Prevent system log from growing too much
ssh root@192.168.1.6[1..n] "echo 'SystemMaxUse=500M' >> /etc/systemd/journald.conf && systemctl restart systemd-journald"
Tailscale on Proxmox
Installing Tailscale
Install Tailscale with
curl -fsSL https://tailscale.com/install.sh | sh
tailscale up
For Proxmox, there are some specific settings documented here. Currently, none of these are implemented in our system since accessing through e.g. https://prox-h1:8006 works well enough.
Note: root access is currently disabled in the Tailscale ACL, so ssh access through tailscale does not work which is why we do not configure it at all. However, you can still access the web UI (or modify the ACL to allow root) and also open a terminal session from there.
Disable expiry, add the tags proxmox and server.
Load balancing with services
Add a service called px on proxmox, listening to tcp/443:

On each Proxmox host, add a service:
tailscale serve -service=svc:px --https=443 https+insecure://localhost:8006
In the Tailscale Service UI, approve all hosts.
[!tip] Make sure to add a tag to your proxmox hosts if not done already since tags are required to make services work.
[!hint] To remove a service which is not needed anymore, use
tailscale serve clear svc:pxon the host in question.
Add the new url https://px....ts.net to the Proxmox 1Password entry.
https://px.fluffy-manta.ts.net/
Test the connection (you might have to do this in a private browsing session). Now all these requests get load balanced to the nearest (fasted) node.
SSO with tsidp
Prerequisites
tsidp needs to be installed in your environment and tagged with idp, e.g. on a cloud provider VM or as an LXC in Proxmox.
Adding an Application Capability Grant
Add the following to Tailscale's Access controls:
// tsidp - calling out
    "grants": [

        // other grants might be configured here
        // ...

        {
            "src": ["tag:idp"],
            "dst": ["tag:proxmox"],
            "ip":  ["*"],
        },
        // tsidp - redirect back
        {
            "src": ["tag:proxmox"],
            "dst": ["tag:idp"],
            "ip":  ["*"],
        },
        // tsidp - main configuration
        {
            "src": ["autogroup:member"],
            "dst": ["tag:idp"],

            "app": {
                "tailscale.com/cap/tsidp": [
                    {
                        // allow access to UI
                        "allow_admin_ui": true,

                        // allow dynamic client registration
                        "allow_dcr": false,

                        // Secure Token Service (STS) controls
                        "users": ["*"],

                        "resources": ["*"],

                        // extraClaims are included in the id_token
                        // recommend: keep this small and simple
                        "extraClaims": {
                            // "bools":   true,
                            // "strings": "Mon Jan 2 15:04:05 MST 2006",
                            // "numbers": 180,
                            // "array1":  [1, 2, 3],
                            // "array2":  ["one", "two", "three"],
                        },

                        // include extraClaims data in /userinfo response
                        // "includeInUserInfo": true,
                    },
                ],
            },
        },
    ],
OIDC client configuration
In the tsidp web ui, add a new client:
- Client Name:
Proxmox - Redirect URIs:
https://px.fluffy-manta.ts.net(no trailing slash)
Note the client id and client secret.
Proxmox OIDC configuration
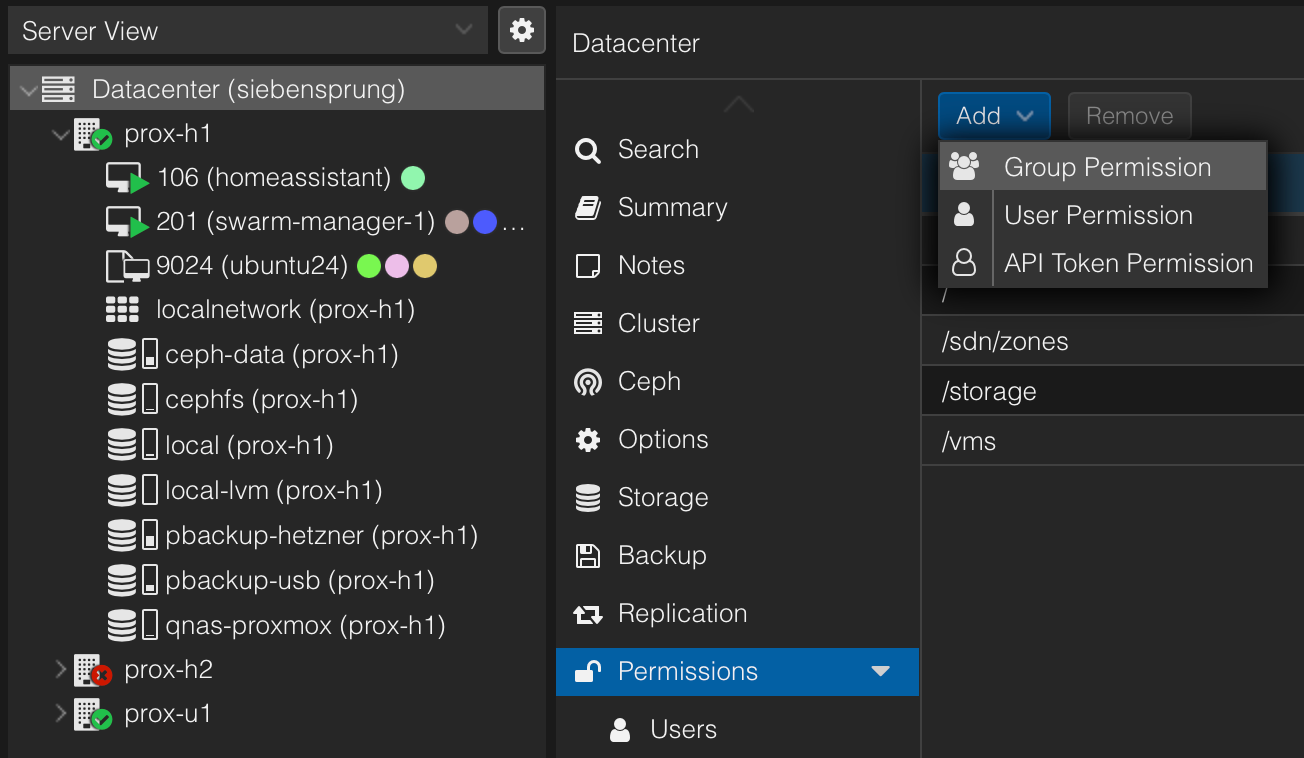
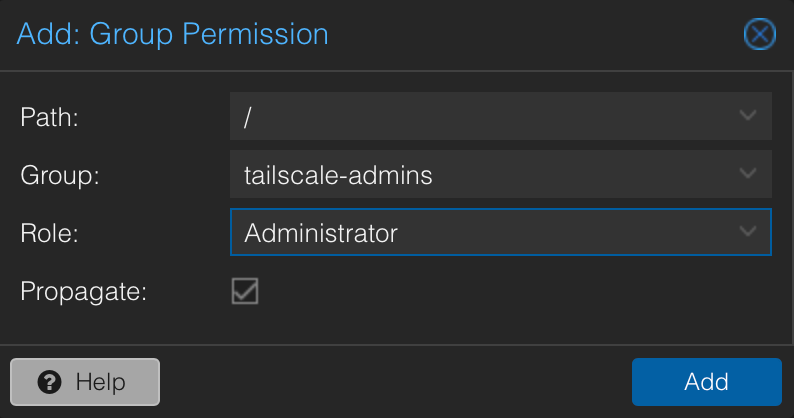
On the Proxmox Datacenter node, create a new group tailscale-admins:

Add a group permission with admin rights and full api access:
Create Tailscale user with the tailscale e-mail address being the username in the form me@mail.com@tsidp and admin group membership:

Now we create the realm called tsipd:

Test by logging out and back in using the tsidp realm. Check that the logged in user can see all cluster's VMs to verify his permissions.
Ceph Installation on Proxmox
Installation
On each node, wipe and format the disks: Format a disk on Linux
Now in the Proxmox UI for each node, click on Ceph and follow the wizard accepting the defaults (use the same network as the host). Make sure to select the No-Subscription repository.
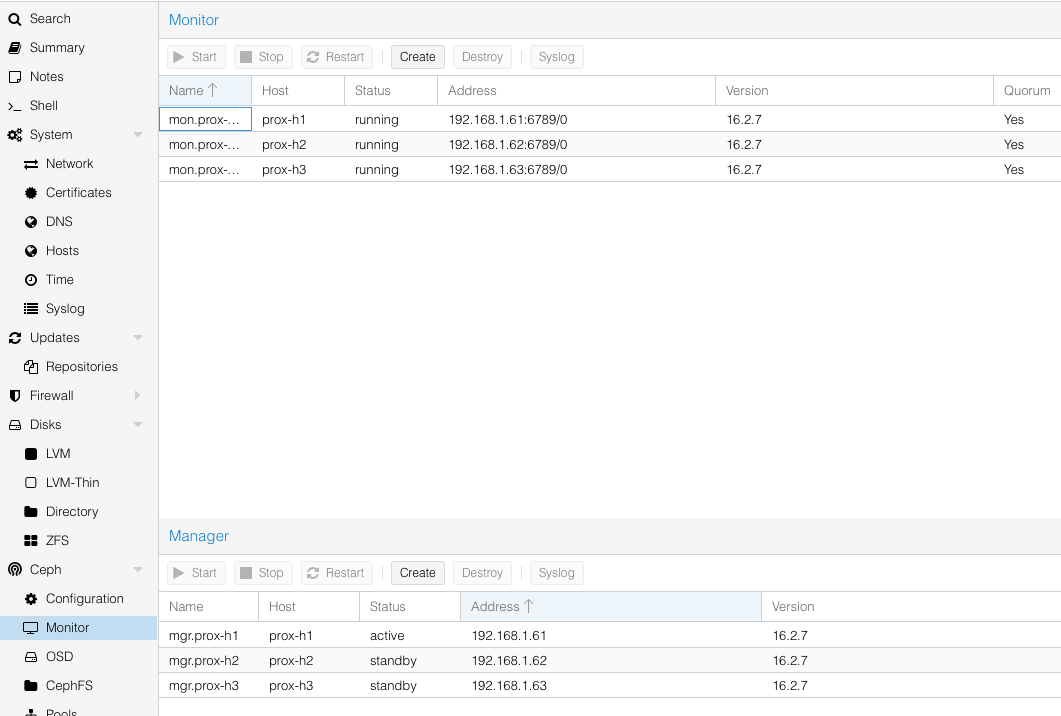
Now, add a monitor on each node (3 monitors are recommended for a 3 node ceph cluster) as well as a manager on each node (number should match the number of monitors and run on the same nodes).
Next, add storage capacity (OSDs). For each node, click on Create: OSD, follow the wizard accepting the defaults making sure to the select the correct disk for Ceph on each node.
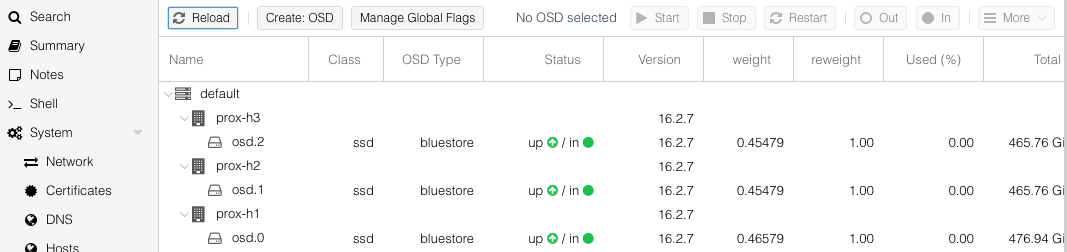
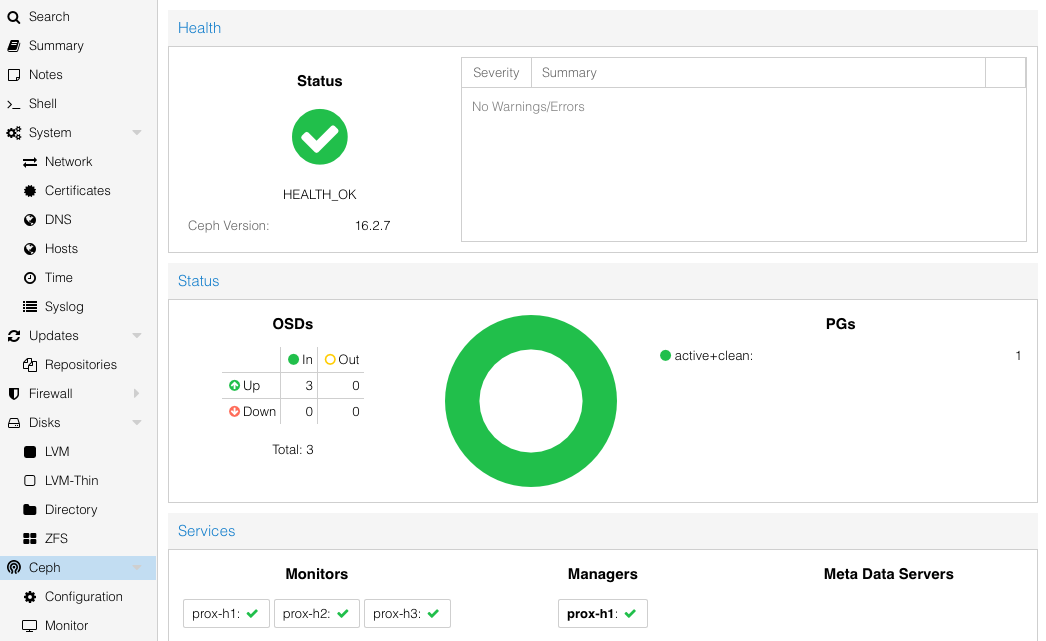
Now, checking the Ceph status, everything should be green:
Next, we need to create a storage pool, ceph-data. Based on the PG Calculator, we create a pool with 128 PGs which is also the default value from the calculator.
To test the performance, create a third pool test-perf, log into the cluster and run read and write tests:
# write test
rados -p test-perf bench 10 write --no-cleanup
# Bandwidth (MB/sec):     72.3299

# read test
rados -p test-perf bench 10 seq
# Bandwidth (MB/sec):     144
Now delete the test-perf cluster again.
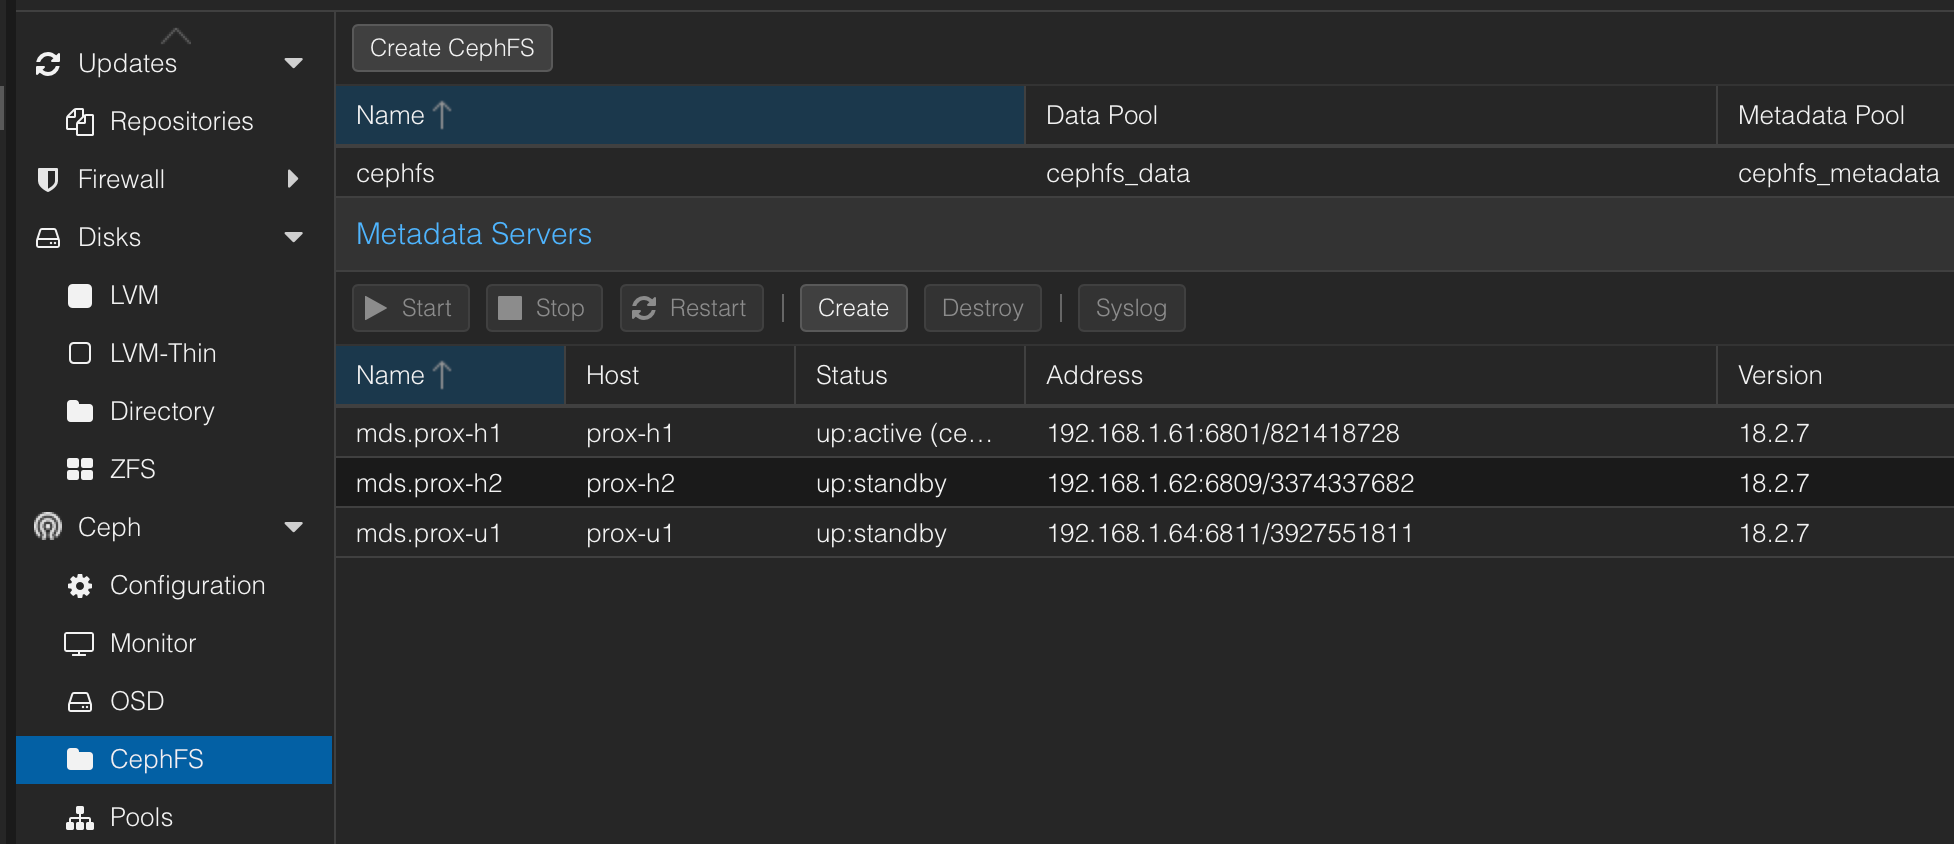
Now we need to set up CephFS at Ceph -> CephFS. First, create a Metadata Server for each node, then click on Create CephFS using the default settings for 128 PGs with the name of cephfs. Behind the scenes, this creates additional pools cephfs_data and cephfs_metadata.
Make sure that also 3 Metadata Servers have been created under CephFS:
Finally, we can create file and block storage based on Ceph.
Shared Storage
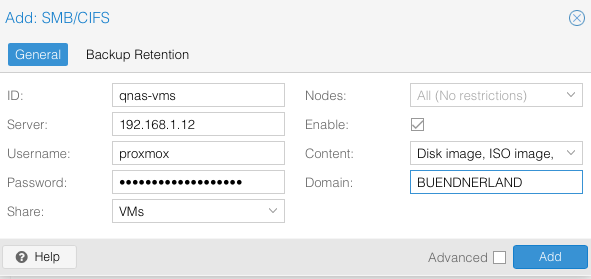
Add SMB/CIFS shared storage from QNAS NAS to the Datacenter for the VMs share and the QNAS Proxmox User 1Password User. Unlike on the screenshot below, leave the Domain field empty:
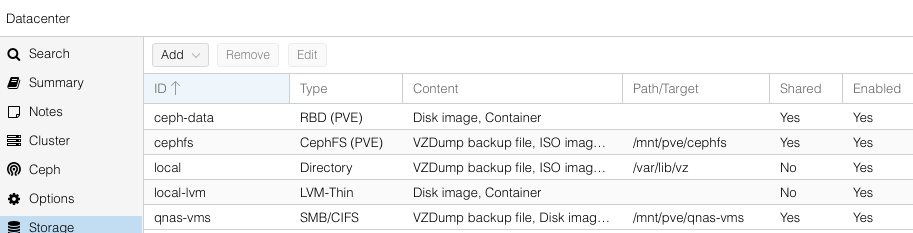
RDB (Ceph block storage) and CephFS Storage already got added automatically:
Pi-hole integration
Note: currently not in use
When all nodes show up with a hostname on the USG, go the pi-hole -> Settings -> DNS and click on save to trigger reloading of the service or simply wait a bit.
Auto-Reboot
We reboot all nodes daily to ensure stable operation. The strategy is “Check & Reboot”:
- Quorum Check: Am I part of a healthy cluster? (If not, STOP).
- Peer Check: Are my peers online? (If not, STOP to prevent losing quorum).
- Ceph Check: is our ceph cluster healthy? (If not, STOP).
- Reboot: Only reboot if the node is empty and healthy.
Create /usr/local/bin/safe-reboot.sh on all three nodes:
#!/bin/bash

# Configuration
LOGFILE="/var/log/safe-reboot.log"
MY_NODE=$(hostname)

log() {
    echo "$(date): $1" >> "$LOGFILE"
}

# =========================================================
# 1. CHECK CLUSTER QUORUM & HEALTH
# =========================================================

QUORATE=$(/usr/bin/pvecm status | /usr/bin/grep "^Quorate:" | /usr/bin/awk '{print $2}')

if [ "$QUORATE" != "Yes" ]; then
    log "ERROR: Cluster is not quorate. Aborting reboot to protect cluster integrity."
    exit 1
fi

# Get current cluster state
NODES_ONLINE=$(/usr/bin/pvecm status | /usr/bin/grep "^Nodes:" | /usr/bin/awk '{print $2}')
TOTAL_NODES=$(/usr/bin/pvecm status | /usr/bin/grep "^Expected votes:" | /usr/bin/awk '{print $3}')

log "Cluster healthy: $NODES_ONLINE/$TOTAL_NODES nodes online. Proceeding with reboot."

# =========================================================
# 2. CHECK CEPH HEALTH (if Ceph is configured)
# =========================================================

# Check if Ceph is running on this node
if /usr/bin/systemctl is-active --quiet ceph-mon.target; then

    # Check if we can reach the ceph cluster
    if ! /usr/bin/timeout 10 /usr/bin/ceph -s > /dev/null 2>&1; then
         log "ERROR: Ceph command timed out or failed. Aborting."
         exit 1
    fi

    CEPH_HEALTH=$(/usr/bin/ceph -s 2>/dev/null | /usr/bin/grep "health:" | /usr/bin/awk '{print $2}')

    if [ "$CEPH_HEALTH" = "HEALTH_OK" ]; then
        log "Ceph cluster is HEALTH_OK. Safe to reboot."
    elif [ "$CEPH_HEALTH" = "HEALTH_WARN" ]; then
        log "WARNING: Ceph is HEALTH_WARN. Proceeding with caution. Full status: $(/usr/bin/ceph health)"
    else
        log "ERROR: Ceph is not healthy ($CEPH_HEALTH). Aborting reboot."
        log "Full Ceph status: $(/usr/bin/ceph -s)"
        exit 1
    fi
fi

# =========================================================
# 3. REBOOT CLEANLY
# =========================================================

log "All checks passed. Initiating clean reboot of $MY_NODE..."

/usr/sbin/reboot
Make the script executable:
chmod +x /usr/local/bin/safe-reboot.sh
Schedule with Cron (Staggered): crontab -e
# Reboot node at 10:35
35 10 * * * /usr/local/bin/safe-reboot.sh
# Reboot node at 11:00
00 11 * * * /usr/local/bin/safe-reboot.sh
# Reboot node at 11:30
30 11 * * * /usr/local/bin/safe-reboot.sh
Resources
Proxmox Resources
Setting up a Proxmox HA Cluster
Proxmox VE Administration Guide
Proxmox with Terraform and Ansible
How to deploy VMs in Proxmox with Terraform
How to create a Proxmox Ubuntu cloud-init image
Provision Proxmox VMs with Terraform, quick and easy
Build a Kubernetes cluster using k3s on Proxmox via Ansible and Terraform
Automating Proxmox with Terraform and Ansible
Container in Proxmox
Running Docker in LXC With Proxmox 7.1
Running Docker under LXC Containers in ProxMox for Extra Granularization
Docker Containers On Proxmox! (Two Different Ways - No VMs!)
Ansible playbook that creates an LXC container
General Blogs
Serve the home - VIRTUALIZATION
Ceph Resources
https://medium.com/@qwonkiwow/setting-up-a-proxmox-ve-cluster-with-ceph-shared-storage-e7a4f652f321
https://www.proxmox.com/en/training/video-tutorials/item/install-ceph-server-on-proxmox-ve